Moving on Over

Hello all. This will be my last post here as I have moved my website to http://www.annieocrafts.com.  I don’t have everything ready but I’m very excited to show off my new website so I hope you will join me over there to continue expressing our creativity with yarn & other projects for around the home and garden. I’ve already got a new post at my new place so I hope you will check it out. If you have any questions or trouble linking to my new website, please let me know here as I will check back here periodically to check for comments or questions.

Thanks

Annie O

How to Felt Knit Projects

I seem to be continuing on a theme with bags, purses & totes. However in case you haven’t felted before, I thought I’d give you another option for a DIY project that is versatile and handy. I’ve seen lots of free patterns again our there in the blogosphere, so I thought I’d share them with you.  I have also included a felted project from my May post of purses because I love it so much.   Don’t limit yourself to purses. I’ve felted lots of baskets, slippers, mittens and cozies using this method.

The first thing about felting is that it requires using 100% wool yarns. Wool, when agitated, binds and locks the stitches tightly together as it shrinks the wool. I learned this lesson firsthand when I was about 20 years old and living on my own.  I decided to wash my favorite wool sweater. Needless to say that after pulling it out of the washing machine it could have fit a toddler!  Lesson learned. So just remember your project will be larger than the finished piece. This process involves knitting your tote or purse, agitating it in the wash machine until you get the size you want, and then blocking it for shapeing.

Instructables has a great step by step on how to work with the felting process.

feltedbag

I hope you give one of these projects a try, or search out your own felting pattern. It opens up a whole new range of projects you can put under your belt.

multicolorfeltpursefeltswirlbagcoloredtotefeltpurseflowerfeltbowlfeltcanandcoastersfeltipadipedfeltedbobblepurse

creativityquote

Have a great, creative day!

Annie O

Not so Secret Garden Prep for Beautiful Flowers

I’m a person who has more hobbies than I can count on my fingers (and toes). However, after refining my hobbies over decades my main passions have remained yarn works (knitting, crocheting latch hook, needlepoint etc), woodworking and perennial gardening.    Although I love all crafts, I have to limit myself to my real passions (although I occasionally fit in an exception)!

This year in the Midwest we have had a cold, short spring and it seems that the typical spring bloom succession for flowers are now crammed into a few weeks in May.  My garden style is an eclectic mix between cottage style and mixed border. I’ve mixed these two styles by using the cottage flowers (roses, delphinium, hydrangeas, iris, clematis) which I truly love. Yet I’m not sold on the chaotic look of an English garden therefore I use the layout of the mixed border. That means instead of having flowers filling every space in the garden, I’ve designed spaces between flower groupings to let each group be it’s own showcase. My garden features shrubs along with perennials. This style lends itself to the long winter months in Minnesota as the shrubs give me some winter interest in the garden when everything else has died back.

With that being said, I give my perennial garden a leg up on the growing season. And that means getting outside to fertilize my plants before they really take off growing. So here’s what I do for my gardens top 5 preforming flowers:shrubrose513

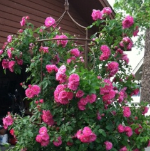
Shrub roses are one of all time favorites. These beauties stand up to extremely cold weather of our Minnesota winters. This picture is of my William Baffin climbing rose the year after I transplanted it. I placed it in my front yard as a focal point and it hasn’t disappointed me yet. I cut it back hard last fall and already the 6-8 canes are about 4′ tall. I fertilize it in early spring (April) followed by two more (around June 1st & July 15th). I apply a systemic fertilizer (which contains insect control also). I also put ripe bananas peels around the base (raked into the dirt) for added potassium and about 2 tsp of Epsom salts for Magnesium.

peonies513

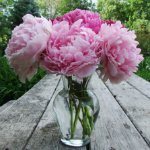
Peonies are another favorite of mine. I have about 30+ varieties and I plan on adding more. These are long lived perennials and their care is pretty easy. They need rich, loamy soil for their best care.  I use an early spring dressing of 5-10-10 and then also once again halfway through the growing season.. Peonies don’t like a lot of nitrogen so keep that first fertilizer number low.  I’ve read that others sprinkle bone meal or fireplace ashes scratched lightly into the soil around the bush. Be careful not to disrupt their roots.

siberianiris513

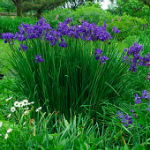
This picture is not of my siberian iris, but I just had to showcase what wonderful plants they are. Mine have yet to look this spectacular. These iris are also a great garden plant with beautiful flowers, great foliage and minimal care. I fertilize mine with a 10-10-10 general fertilizer in early spring and then again after they bloom. They like a lot of water and I mulch my iris to help conserve on water loss.

Hydrangeas are another flower that are a must in my garden. This in’t a photo from my garden, but it is a great option to show you the colors hydrangea513
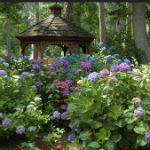
available in the hydrangea world.  My new favorite is called Limelight and I’m going to grow it in the standard tree form. I have it ordered and once I get it in, you’ll be the first to see it. Hydrangeas flower blue in acidic soil & pink in limey soils. Because mine are close to the basement foundation they flower pink. Either way, I love them. I fertilize mine with a general 10-10-10 fertilizer once in June. Another option is to top dress with composted manure.

Rounding out my top 5 perennials is the delphinium. They require more work than some other flowers, but their grand display of flowers keeps me planting them.  I love the colors delphinium513
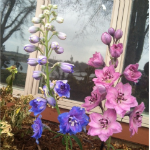
and I order my seeds from Australia. They love good soil with some added compost. They need at least 1″ of water a week and I make sure they’re mulched well.They like full sun and I have to stake these beauties as some can reach 6′ tall blooms. I place mine in somewhat wind protected areas of the garden, and they’re always staked for security. These also are short-lived perennials, but they can be divided in early spring fairly easily.

So there’s my top five perennials that I grow in my garden. I’d love to hear from you other suggestions to try.  Thanks for stopping by!gardening513

Annie O

Children’s Purse Patterns

The other day I posted some fun spring and summer purse projects to inspire you. I have added some children’s purses because they are so darn cute.  One of the benefits to these projects are that they’re a quick project. They also are great opportunities to use up some of your stash yarns!

These patterns just brought a smile to my face.  Although my daughter is now an adult, I think I’ll have to make one up for one of my nieces. Let me know if you like these patterns.

flowerpursekittybagchildstrawberrypurseicecreampurseladybugpursechildpursedropssundaepurse

I hope you all have a great weekend!

creativity518

Annie O

Knit and Crochet Spring/Summer Purses

I’ve put together a bunch of free patterns for knit and/or crochet purses and bags for the upcoming spring & summer months. We here in Minnesota have had a cold spring and old man winter just won’t go away. So with that in mind I thought it would be fun to whip up a cute bag or purse to accessorize our summer wardrobes! Here are just a small array of free patterns available to make just in time for the great summer months.

bluecreamrufflebagbluecrochetdropsrufflepursedropslooppursecrocstitchpursegreenpursedropscarryallpursefeltedpursefeltedbobblepurseredipadbag

I hope I’ve offered enough pattern variety to get you started on this summer’s accessories!

Annie O

DIY Quote Artwork

I recently went to a lovely craft festival and spotted some artwork that I thought was a must have.  Quote art is very popular right now from stenciling & painting on walls to putting quotes into frames.  I quickly saw that the artwork was way over my budget as most of the artisan’s work was from $70 and up. However, after letting my brain rummage around for a cheap  thrifty alternative, I came up with a piece of artwork that cost under $10.  Of course I forgot to take pictures throughout the process, but it’s pretty easy if you want to try and duplicate it.

bathroom pic

I’m sorry for the terrible picture (glare and all), but I didn’t want to dismantle the entire project.

Here’s what you’ll need for the project:

picture frame ( mine was $4 from the thrift store)

(2) background & (2) quote art papers ( I found both at JoAnn’s in the scrapbooking section)

(1) 8″X11″ children’s art foam sheets (they come in a variety of colors at any craft store)

a few artificial leaves (they’ll be used to cover where the foam joins together)

Begin by placing your colored background onto the backing of your frame.  Because my frame was wide and square I needed  2 sheets of background paper which I centered so that later my black foam strips would cover up the joint. I then cut my foam pieces into (4) 1-1/2″ wide strips & long enough to fit to the edge of the backboard.

The quote I used was as follows:

RISK more than others think is safe

DREAM more than others think is practical

CARE more than others think is wise

EXPECT more than others think is possible

I then printed my quote on decorative paper with the font I wanted. I bought two sheets of paper to allow for mistakes & I didn’t want to run back to the craft store for 1 piece of paper. Each quote was approximately 1/4 of the sheet of decorative paper. I cut the quotes to the size that I thought would look best for the frame. I then used a candle and burned the edges of the quotes to give it a more rustic look. I do love my rustic style!  I  placed my black strips and quotes where I thought they should go and once I liked my final setup, I slightly glued the quotes in place. I then layed down my 4 pieces of black foam. Where they butted up in the middle, I added artificial leaves to cover up the seams. I added a few extra at the bottom just because I liked the look.

The possibilities are endless and can be used with a variety of frames you may find in the thrift stores.  This project would have been even easier if I had found one of those gallery style frames where it is already partitioned.  I hope this inspires you to add your own creative touch for wherever you call home.

creativity einstein

More Knit Stash Projects

Time passes so quickly. I’ve been consumed with looking at things in the blogosphere and planning all my future projects.  I suddenly realized that I hadn’t posted in awhile. I have some more free patterns for great quick projects to knit up. I found some really nice projects for the home which includes this bold colored pillow over at Pickles and this springtime decorated planter cover from the Drops Studio, both of which would be a snap to knit up.  The plant cover would be great use with recycled food cans from anything you have in the kitchen. Punch a few holes in the bottom for drainage and you’re good to go!Screen Shot 2013-04-15 at 8knitplantercover

If you’ve never been to the Drops Yarn Studio website, beware. You will leave with so many knit & crochet projects on your to-do list it’ll make your head spin! And the patterns are free. It’s one of my favorite sites for yarn-work projects.

I also spotted a lovely braided necklace over at OlgaJazzy. She is an awesome knitwear designer extraordinaire. Her blog asks not to repost patterns and photos from her site, so I am honoring that request. What I love about her project is that it can  be worn as a necklace or bracelet. Now how versatile is that!   So if the idea intrigues you to take a peek at her work, you won’t be disappointed.  And it’s a free pattern.

And here are three more projects for you. I included one for your cat too because I do love our four legged companions.

knitcowlcatnipheartknitbag

Here’s a cute little picture I found which doesn’t have a pattern included, but she has a short post addressing the possibilities of your own creativity. I’m with her on this one!

chicken hat

Have a great day!

creativitymayaangelou

10 Knit Stash Projects

Because I don’t want you all to feel I’m giving all the crocheters out there more attention, I’ve decided to add some quick knitting shash patterns for you to attempt. I’ve tried to find patterns with basic stitches for all of us short on time to dedicate to 1 project. If you’re a more advanced knitter one can always revise by adding different stitches or color patterns.  It’s meant to get your creative mind working.  These projects are a great way to get your feet wet knitting a variety of projects and not feel upset making mistakes or giving up because the project takes too long to complete. These options give you an opportunity to make a quick gift for yourself (or someone else) and instant gratification on completing a project. In no time flat you’ll have personalized gifts to give to anyone during the year. You may even have to start storing your completed projects for a spur of the moment gift. I threw the pillow pattern in because I love the look. Why not knit it up as a small sachet for that perfect gift.  What could be better than that? I must say I haven’t been able to keep up with my own advise, but this gives me some momentum to push forward and try again.

fruitcozypincushionpillowphone coverleafcoastercorktoppermugcozy

flowerheadbandheadband
glasszippercase

So there you have 10 more easy, quick projects to try. Have a great day!

keepcalmcaston

10 Minute, $8 Spring Wreath

I’ve created a spring time wreath for under $10 and took me less than 10 minutes to complete. How’s that for instant gratification!

springwreath

The other day I pinned a cute post from Copy Cat Looks that had a quick, beautiful wreath for spring.  She has a great tutorial if you want to follow.

Copy Cat Looks Spring Wreath

Her project was set up a little different than mine. I’m more of a “just winging it” type person so I proceeded building the wreath from what I recalled from her post.  I bought 5 small spring time sprigs at Michael’s (because they were on sale for less than $2 a sprig).   I used a smaller wreath form because that’s what I had on hand and the wreath looks fine. Sorry I have no tutorial pictures, but it was so quick and simple that I was finished before I even thought to get out my camera!

Here’s what you need:

  • grapevine wreath form
  • 5 sprigs of tulips
  • hammer
  • thumb tack
  • fishing line for hanging

I chose a coiled, grapevine wreath. You can use any form you have on hand. Just remember to pick a base that you don’t mind having show through.  I cut the branches off each sprig, but left the leaves intact as I needed to add filler for the end result. After I finished cutting all the sprigs, I just started pushing them in around the base (without glueing ) in a clockwise manner to ensure a more balanced end look. Once my wreath was almost completed, I hung it on the door with fishing line (almost invisible) and wrapped the line around a thumb tack which I tapped in to the top ledge of the door.

Once I had the wreath positioned I was able to fill in empty spots with the 10 or so flower clusters I had left.  Now how’s that for a quick, no frills beautiful wreath. It so cheery, I love it.

TDC Before and After

More Crochet Stash Projects

I couldn’t resist adding these crochet projects after finding such creative projects from around the web. I’m constantly amazed at all the creative talent I see everyday. And because I don’t want anyone to feel they have all this stash yarn with no ideas what to make with it, I have included some more crochet patterns for your next stash project. I am going to try and keep a box next to my stash yarns for all my little completed projects so if I need something for a quick gift, I’ll have it on hand (& know where it is)!  That will also help jog my memory as to what is possible when wading through my yarn for my next small project.

flowerpurse creampurse anklesandalwrap

babybirdhat

bracelet

electronicscase

fruitdandelionbasket

sachet

pincushion

cupcozy

turtle

teapotcozy

bathpuff

hope you have a great day.

idratherbecrocheting